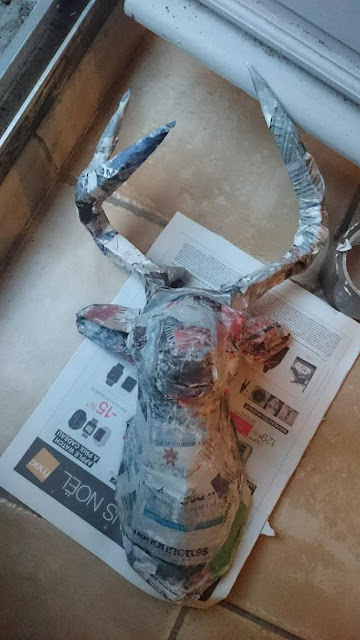
On en a vu beaucoup des têtes de cerf sur Pinterest et Instagram cette année. Donc je me suis dis pourquoi pas le tenter à mon tour ? Je n'ai rien inventé pour ce DIY, mais je voulais partager le résultat avec vous quand même. Je vous met le lien vers la vidéo et le blog de Chezlin celle qui m'a inspiré cette tête de cerf. L’assemblage a été un travail de longue haleine (je me suis un peu perdue dans les morceaux), et une des cornes avait du mal à tenir, mais je pense que le problème venait de mon assemblage, pas de Chezlin. La partie papier mâché était bien drôle, j'en ai mis partout sur moi et sur ma table! Mais j'aime bien l'effet que ça donne avec du papier journal.
Lorsque tout est parfaitement sec, j'ai laissé sécher toute la nuit, il est temps de peindre. Pour la peinture j'ai opté pour quelque chose de simple : blanc et doré pour les cornes. Parce que ça colle parfaitement avec la déco de mon appart, mais surtout parce que je ne suis pas très douée avec un pinceau !
Pour les cornes j'ai utilisé une bombe dorée. Ça tombait bien on en vendait partout pendant la période de noël :)
J'ai découpé un socle dans un carton épais en laissant un espace plus grand en haut pour pouvoir mettre les clous. On colle la tête de cerf en papier mâché avec le socle, on cloute au mur, et voilà !
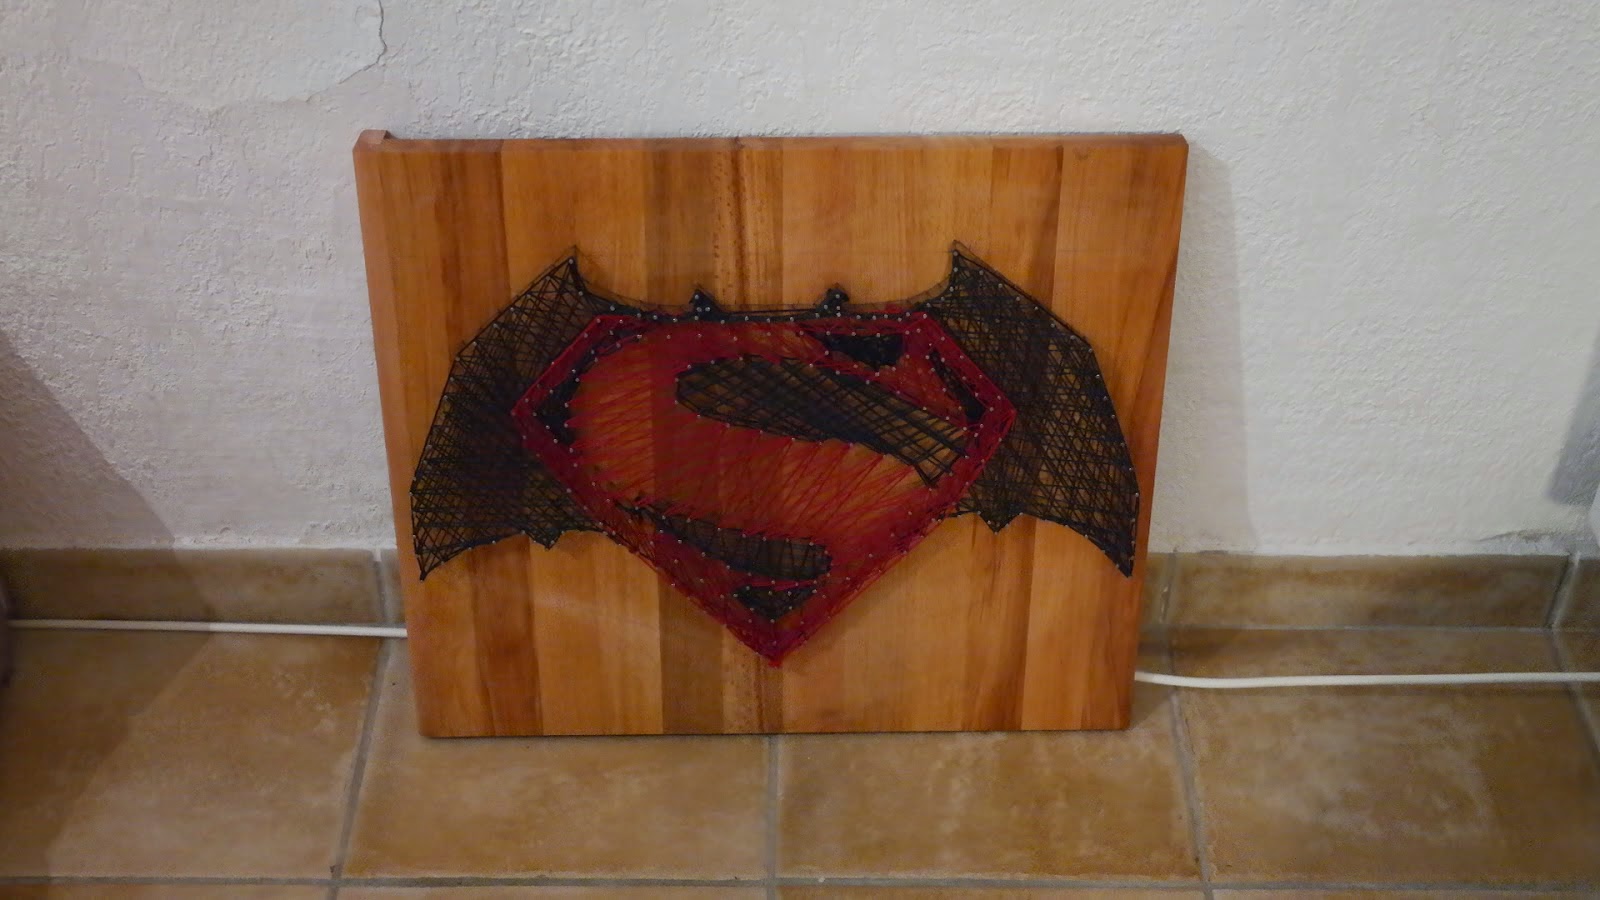
This year for Valentine's Day I was inspired by this picture found on Pinterest. I did not want to recreate a state or a country, but something more in relation with the likings of my Valentine. So I went for the futur BatmanVSuperman: Dawn of Justice logo movie.
You will need:
A wooden stand, I bought a cutting board 46x53cm (Ikea)
Flat-headed nails
A hammer
Yarn, I used wool yarn 3,5mm
A template. If the drawing you want to do is not too big, you can print a template to draw the edges on the cutting board, it would be easier and faster this way. I couldn't find a template which was big enough so I had to draw freehand which took more time.
Start by positioning your template on the wooden stand and draw the edges with a pencil.Then grab your hammer and your nails and start by nailing the tip of your design to allow a better definition at the end.Then nail up equidistantly on the lines at equal distance.
When you are done, make a knot on one of the nail and go from nail to nail until you are happy with how it turned out. If you want to do psychedelic effect,
do a backward and forward movement going from the first nail where the knot is to the second nail, then back to the first nail and go to the third nail then back to the first nail.... And there you are !
Cette année pour la Saint-Valentin, je me suis inspirée de cette image trouvée sur Pinterest. Je ne voulais pas recréer un état ou un pays, mais quelque chose en rapport avec les goûts de mon Valentin. J'ai donc opté pour logo du futur film Batman V Superman: Dawn of Justice.
Il vous faut:
Un support, j'ai pris une grande planche à découper 46x53cm (Ikea)
Des clous à tête plate
Un marteau
Du fil, j'ai utilisé du fil de tricot 3,5mm
Un modèle. Si la taille du dessin souhaitée n'est pas trop grande, vous pouvez imprimer un modèle pour ensuite en dessiner le contour sur la planche, cela sera plus simple et bien plus rapide. Je n'ai pas pu trouvé de modèle pour la taille de ma planche, je l'ai donc dessiné à la main ce qui m'a pris un peu plus de temps.
Commencez par positionner votre modèle sur votre planche, et tracez les contours à l'aide d'un crayon. Puis munissez-vous de votre marteau et de vos clous et commencer par clouter les pointes de votre modèle (s'il y en a) pour permettre une meilleure définition de votre projet à la fin. Ensuite cloutez sur les lignes à égale distance.
Pour filer, commencez par faire un nœud simple sur un clou et faites votre chemin de clou à clou. Si vous souhaitez un effet plus psychédélique, faites un va-et-viens avec le clou où le fil est noué. C'est-à-dire que lorsque vous passez le fil sur le second clou, revenez sur le premier (où se trouve le nœud) puis allez sur le troisième clou et revenez ainsi sur le premier, puis allez sur le quatrième et ainsi de suite. Et voilà!
I really like to take care of my nails, put on some nail polish, and try new methods. Unfortunately, and I don't know if it's the same for you, but even if I like having nice hands, my nails have a hard time growing up, and when they do grow, they broke one by one despite the effort I make to keep them healthy. For my thumb nail I know I can't do anything, younger, it got caught in between the door, since then when it grows up it breaks, like, every time! For the rest of my nails it may be a deficiency in vitamin.
Also, I am not a nail-art artist, so these tutorials are easy to copy and doesn't required a lot of tools (you may already have them in your house).
Tips:
To avoid split fingernails, file your nails in the same direction.
To keep you nails stronger, and help the nail polish stick easier, apply a Top Coat, it will prevent your nails from getting yellow at the same time.
To apply you nail polish correctly and allow a quicker drying, wipe out the side of the brush to remove the excess of nail polish.
Apply the nail polish in three times:
- Apply first on the middle of your nail.
- Then on each side of your nail.
- Let it dry a few minutes. And you are ready to apply a second layer!
Finally, for a manicure that seems to have been done at a salon try to not get polish on your cuticles. Apply it a bit upper than your skin and then drag it slowly down.
 |
| China Glaze "Strong Adhesion Base Coat" - O.P.I. "Malaga Wine" - O.P.I. "Hotter than you pink" - Miss Cop "Top Coat" |
 |
| One layer is enough |
 |
| If you have a product like Kiesque all the better, otherwise tape will work. |
 |
| You can use any sponge you have. Apply the pink nail polish so that it's on the bottom of your nail. |
 |
| Two layers later... |
 |
| Apply Top Coat |


